This is actually an incredibly easy step so before we do that let's do a little setting up of our system's architecture. Yuk, I hate phrases like that, over complicated computing science terms are a pain in the butt and will not feature in this blog where avoidable. I'd much rather say let's get all the bits of our system in place...
As mentioned we are going to use OpenCV for all our reasoning purposes so we need a way of accessing OpenCV from Java. In order to do this we make a native library that we can call from within our Java code using the Java Native Interface (JNI). What is a native library you ask? It is code written in another language, often C, that can be called from other programs. All those .dll files in your Windows system or all those .so files in your Linux distribution are examples of native libraries and are what we are about to make. Don't worry, it's not as scary as it sounds!
I'm a Netbeans user so I'll be showing the set up for Netbeans, any other IDEs will have a similar process though. You didn't think we were going to be programming with Notepad did you? I'll also be using Windows so will often refer to our native library as a .dll file, if you are using Unix then it'll actually be a .so file but I'm sure you Unix gurus are clever enough to figure that out.
Before we make the library we first write our Java side of the program as the routines we need on the C side (love saying that) will be based off of those declared in the Java side. So fire up your editor of choice and create a new 'Java Application' project, I've called mine GamePlayer, and make sure the 'Create main class' check box is checked. If your editor doesn't have one, or you missed it, you'll just have to create the main class yourself but it only takes a couple of minutes anyway. Then enter in the following code:
package gameplayer;

/**
 * Application to play games, using OpenCV library for analysis via JNI
 * @author RyanfaeScotland http://workingwithcomputervision.blogspot.com
 */
public class GamePlayer {

    /**
     * @param args the command line arguments
     */
    public static void main(String[] args) {
        try{
        System.loadLibrary("GamePlayer"); // Loads our native library into memory
        printMsg(); // Calls the printMsg() method
        }catch (Exception e){
        e.printStackTrace();
        System.exit(-1);
        }
    }

    static public native void printMsg(); // Declares our native method
}System.loadLibrary("GamePlayer"); // Loads our native library into memoryprintMsg(); // Calls the printMsg() method (This isn't insulting is it?)static public native void printMsg(); // Declares our native methodThe second line here calls the printMsg() method. Any Java programmer will already know this, any other programmer could probably figure it out, the only reason I point it out is to show that native methods are called exactly the same way as those declared in our Java class.
Finally we have the declaration of our printMsg() method. It has to be static cause we are calling it from a static context (inside Main()), it has to be public so that JNI can see it, the native keyword lets the compiler know that the actual method declaration is else where in a native library (we don't need to say which) and finally void lets the compiler know that the method doesn't return anything.
So that's it for our Java side, you can now compile it and if you want run it to see the error. Once it is compiled you need to open up a command prompt (Start Menu -> Run -> 'cmd') and navigate to the classes folder of the compiled program, for me it is 'C:\Users\Ryan\NetBeansProjects\GamePlayer\build\classes' and for you it should be something similar. Once you are there run the following command:
javah gameplayer.GamePlayerThis will produce a C header file with the name packagename_ClassName.h (so for me it was gameplayer_GamePlayer.h) which contains all the C code we need in our C projects header file. Now that we have our header file we can go on and create the rest of our C project which will become our native library.
Head back into your editor and create a new C/C++ project, if you have the option (Netbeans does) select C/C++ Dynamic Library, the name isn't too important but I've called mine GamePlayerC to remind me what it goes with. This will open the editor up and configure it to output dynamic linked library files or .dll files as they are more commonly known! Now that the project is started copy across the C header file from the Java project's directory into the newly created C and add it to the project's header folder. Create a new class in the C project's sources folder and name it the same as your Java class, so mine is called GamePlayer.cpp. Notice that we may want to create this library using a mixture of C and C++ code so we give it a C++ extension just in case. Now we are ready to create our native library!
Don't worry at this stage if you are getting a lot of errors or warnings about your project, we'll fix them at the end.
Kindly the javah program has already done most of the work for us in relation to writing code, all we need to do is a bit of copy and pasting. Go into your header file (gameplayer_GamePlayer.h) and copy the line that declares our method along with the comments above it into our source file. So for me that means the following lines:
/*
 * Class:     gameplayer_GamePlayer
 * Method:    printMsg
 * Signature: ()V
 */
JNIEXPORT void JNICALL Java_gameplayer_GamePlayer_printMsg
(JNIEnv *, jclass);First off add a name to the two parameters that are within the parentheses and then change the semicolon at the end to some opening and closing curly brackets so that you end up with this:
/*
 * Class:     gameplayer_GamePlayer
 * Method:    printMsg
 * Signature: ()V
 */
JNIEXPORT void JNICALL Java_gameplayer_GamePlayer_printMsg
  (JNIEnv *env, jclass obj){

}#include "gameplayer_GamePlayer.h"
#include
/*
* Class: gameplayer_GamePlayer
* Method: printMsg
* Signature: ()V
*/
JNIEXPORT void JNICALL Java_gameplayer_GamePlayer_printMsg
(JNIEnv *env, jclass obj){
std::cout << "GamePlayer library loaded.\n";
}
There is just a little bit more before we can compile and run everything. We need to jump into the C project's properties and add the following parts.
- To the C++ compiler's Include Directories we add the path to the include folder and the include/win32 folder which are in your Java jdk folder, for me it is : "C:/Java/jdk1.6.0_26/include;C:/Java/jdk1.6.0_26/include/win32" (This should fix all the include errors in the project)
- To the Command Line Additional Options add the line "-Wl,--add-stdcall-alias" (Just trust me on this one)
- Flick over to the Linker tab and change the Output directory to "${CND_DISTDIR}/GamePlayer.dll" (The output file name doesn't need to match the project (although it makes sense to have it similar) it just needs to match the library name called in Java)
Here is a couple of pics in case it isn't clear:
 |
| Include Directory and Addition Options |
 |
| Linker Output file |
We can now compile the C project and it will output our .dll file to the dist/ directory. Congrats you've just made a native library! Now let's use it!
Go back into the Java project from earlier and go into its Properties and go on to the Run page. In the VM Options add the line '-Djava.library.path="C:/Users/Ryan/NetBeansProjects/GamePlayerC/dist"' except make the path point to your C projects dist directory. This means when we run our program it will know where to look for our native library and any time we rebuild the library the newest version will automatically be used. This has been a very text heavy post so here is a pic of that as well:
That, finally, should be it. Run the program from Java and here is your output (look away now if you want to avoid spoilers!):
Well done again! Give me a message in the comments if it doesn't work and I'll try help sort the problems and update the guide to reflect any issues.
Oh, we were going to capture the game board in this post weren't we? Right let's take care of that now.
Go into your Java project and change the class to the following:
Here we use the very useful Java Robot class to give us access to some great methods. The only one we use just now is the createScreeenCapture method which captures and returns a portion of the screen as a BufferedImage. As an argument it takes a Rectangle which is the size and position of the portion of screen it will capture, hence we use the Toolkit.getScreenSize method to return a Rectangle the full size of the screen and pass it in as an argument to capture the whole screen. Simple! |
| VM Options |
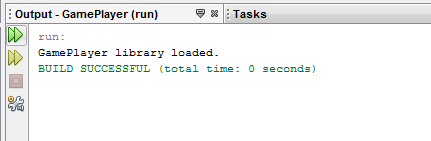 |
| Totally worth the effort output |
Oh, we were going to capture the game board in this post weren't we? Right let's take care of that now.
Go into your Java project and change the class to the following:
package gameplayer;

import java.awt.Rectangle;
import java.awt.Robot;
import java.awt.Toolkit;
import java.awt.image.BufferedImage;
import java.io.File;
import javax.imageio.ImageIO;

/**
 * Application to play games, using OpenCV library for analysis via JNI
 * @author RyanfaeScotland http://workingwithcomputervision.blogspot.com
 */
public class GamePlayer {

   /**
    * @param args the command line arguments
    */
   public static void main(String[] args) {
       try{
       System.loadLibrary("GamePlayer"); // Loads our native library into memory
       printMsg(); // Calls the printMsg() method
       Robot rob = new Robot();
       Rectangle rect = new Rectangle(Toolkit.getDefaultToolkit().getScreenSize());
       BufferedImage screen = rob.createScreenCapture(rect);
       ImageIO.write(screen, "PNG", new File("Screen.png"));
       }catch (Exception e){
       e.printStackTrace();
       System.exit(-1);
       }
   }

   static public native void printMsg(); // Declares our native method
}We then save the BufferedImage to file using the ImageIO.write method so we can view the captured image and be sure it has worked.
And that is all there is to it. Told you it was easy. Next up we'll look at passing the image data we captured in Java into C using the JNI.
No comments:
Post a Comment