You can get the latest version of OpenCV from it's home at http://opencv.willowgarage.com. Although we may not necessary need the latest version we will use it anyway so that we have access to all the latest bug fixes and features. Also it has the added bonus that the Windows version, the version I plan on using, comes pre-built hence removing a lot of the issue causing tasks I mentioned earlier.
Go to the downloads section and get the latest version (version 2.4.2 as of posting). If you are running Windows you can get an .exe file that will take care of most of the installation for you, if you aren't then I'm afraid you're stuck building and compiling yourself. It's ok though, you're on a non-Windows system so you're obviously smart and there are pretty clear instructions for most popular operating systems.
Assuming you are in Windows, download and run the installer. I'm installing into the directory C:\OpenCV2.4.2 so whenever you see me refer to here just substitute in your installation directory if you've installed elsewhere. Inside the directory you'll find one folder called opencv and inside there you'll find a whole host of files and folders:
 |
| The files and folders of OpenCV2.4.2 |
Go into your C project and open the Properties window. Select 'Build' -> 'C++ Compiler' and go to 'Include Directories'. There will already be 2 locations there that we added earlier, we are now going to add an OpenCV directory to the list, namely the 'include' directory at 'C:\OpenCV2.4.2\opencv\build\include'.
Then you want to jump into the 'Linker' tab and add the 'lib' directory into the 'Addition Library Directories' field. In theory the location of the 'lib' folder will depend on the architecture of the system you are using. If you are using a 64 bit system use 'C:\OpenCV2.4.2\opencv\build\x64\mingw\lib' if you are using 32 bit then use 'C:\OpenCV2.4.2\opencv\build\x86\mingw\lib'. I make a point of saying in theory because I keep getting a 'File format not recognised error' when I try and use the 64 bit ones hence I have to use the 32 bit ones despite being on 64 bit Windows.
Once you have this set go into the 'Libraries' field and add all the files from the 'lib' directory using the 'Add Library' button. It should end up looking like this:
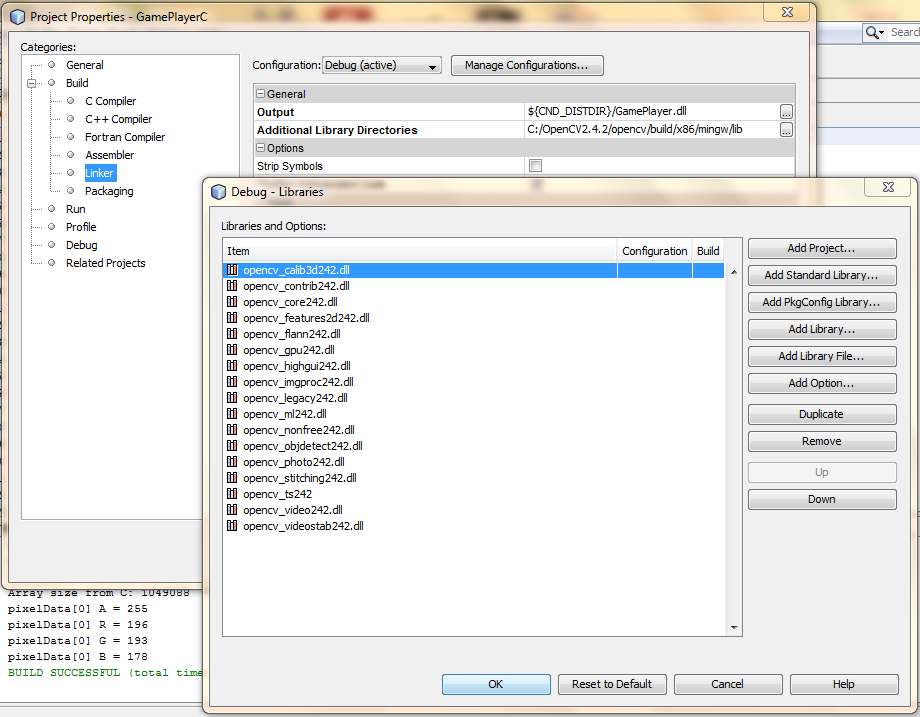 |
| OpenCV library files added from 'lib' folder. |
 |
| Adding the 'bin' folder to the system path. |
Go back into the main GamePlayer.cpp class in the C project and add an include for the OpenCV file highgui.hpp. This is done by adding the line:
#include "opencv2/highgui/highgui.hpp"
To the top of the file next to the rest of the includes. Then add the lines:
cvNamedWindow("Hello World", CV_WINDOW_AUTOSIZE);
cvWaitKey(0);
just after the call to fflush(stdout) but before the env->ReleaseIntArrayElements(data, elem, 0).
Clean and build the C project and then run the Java project. If all has went well a window titled 'Hello World' should appear showing nothing but a grey box and it should disappear whenever a key is pressed:
 |
| Window generated by OpenCV. |
I'm going to post up about my problems getting the 64 bit versions of the libraries running in the next post and will hopefully have some answers for you as well. Until then I suggest playing about with OpenCV now that we have it going, try loading in some images from a file or if you want to get a head start on our next step trying finding out how to convert our image data back into an image OpenCV can use.
Catch you next time.
No comments:
Post a Comment